I did it wrong for the first two weeks. Cranked the TOLOCO Massage Gun up to level 5, pressed it into my already-destroyed quads the night after a heavy squat session, and spent the next morning walking down stairs sideways. The gun was not the problem. I was using it at the wrong time, on the wrong settings, with zero idea of how percussion therapy actually works on inflamed tissue.
A percussion massage gun is not a magic eraser you run over sore muscles. It is a tool with a protocol. Get the protocol right and you genuinely cut recovery time, reduce the worst of DOMS, and keep training more frequently. Get it wrong and you irritate already-stressed tissue and feel worse the next morning. This guide covers what I have learned across hundreds of sessions with the TOLOCO: when to use it, which attachment for which muscle group, how much pressure, how long per area, and what to avoid entirely.
Stop guessing. The TOLOCO comes with 10 attachments and 20 speed levels built for exactly this protocol.
Rated 4.4 stars by over 62,000 buyers. Silent brushless motor. Long enough battery life for a full-body session after every workout.
Amazon Check Today's Price on Amazon →Before You Start: Understand the Two Windows for Using a Massage Gun
Percussion massage works differently depending on when you use it relative to training. There are two main windows and they have different goals.
The pre-workout window is about activation. Five to ten minutes before training, light percussion on the muscles you are about to load increases blood flow, wakes up the neuromuscular connection, and loosens fascia without fatiguing the muscle. You want low-to-medium speed here, no more than 30 seconds per muscle group. Think of it as a warm handshake between your nervous system and the tissue, not a beating.
The post-workout window is about recovery. This is where most people want to use a massage gun and it is also where most people make mistakes. Right after training, your muscle tissue is inflamed and sensitive. The best time for deep post-workout percussion is 30 to 60 minutes after you finish, once your heart rate is down and the acute inflammation has started to settle. If a muscle is visibly swollen or tender to the touch, treat it gently or skip it entirely for that session.
Step 1: Choose the Right Attachment for the Muscle Group
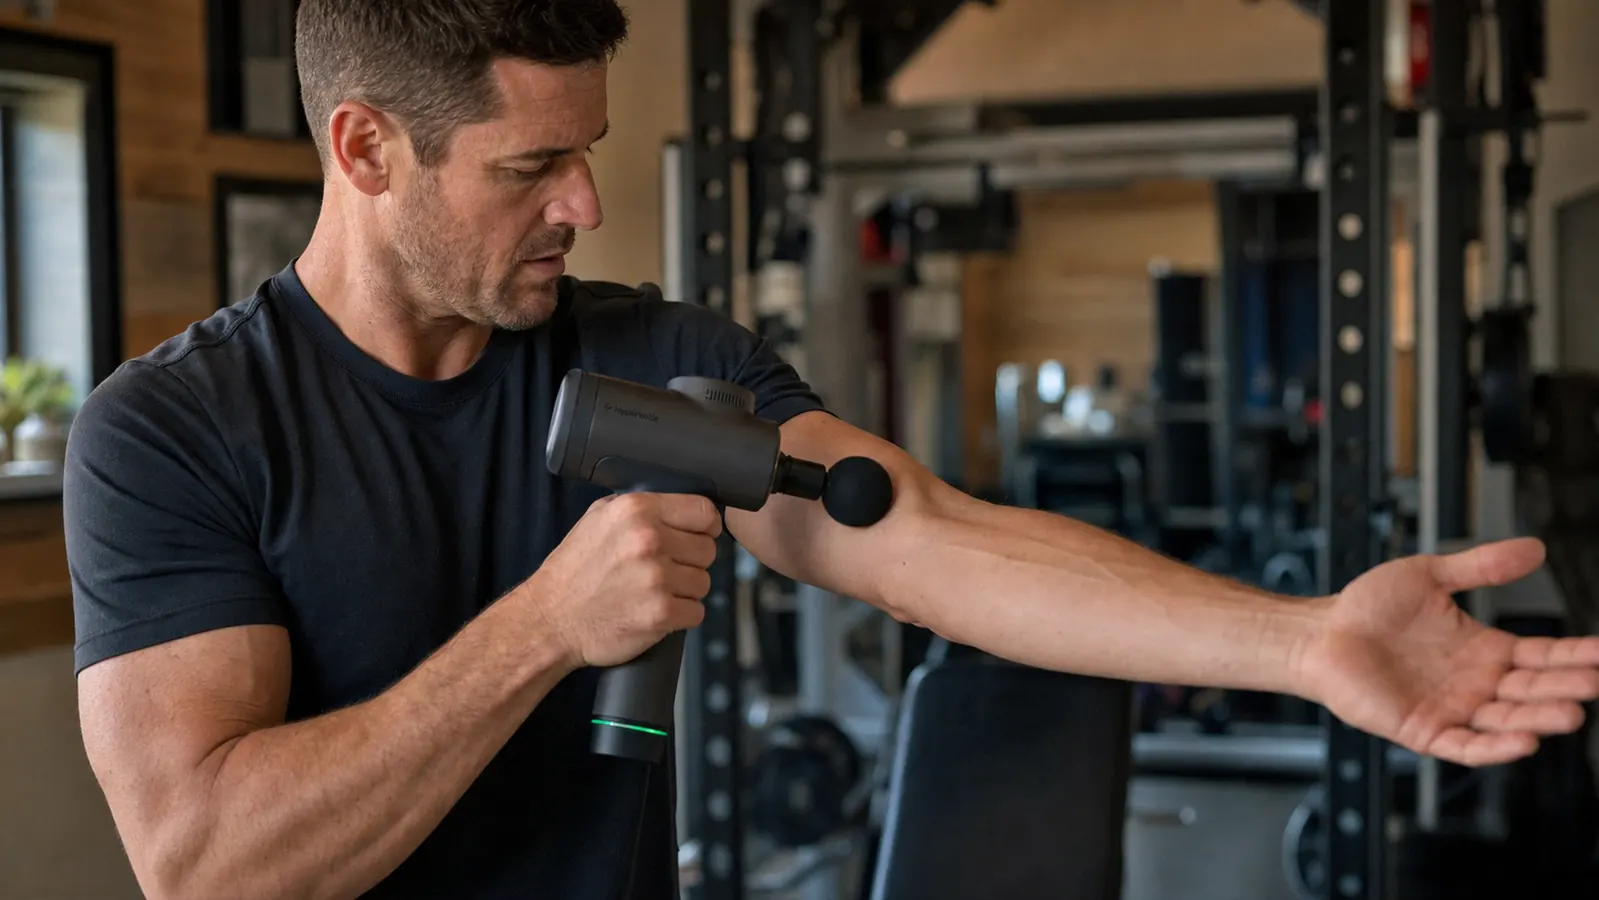
The TOLOCO includes 10 attachments and the choice matters more than most people think. The large round ball head is the right starting point for almost every large muscle group: quads, hamstrings, glutes, upper back, calves. It distributes force across a wider surface area, making it forgiving even when you are working near tired tissue.
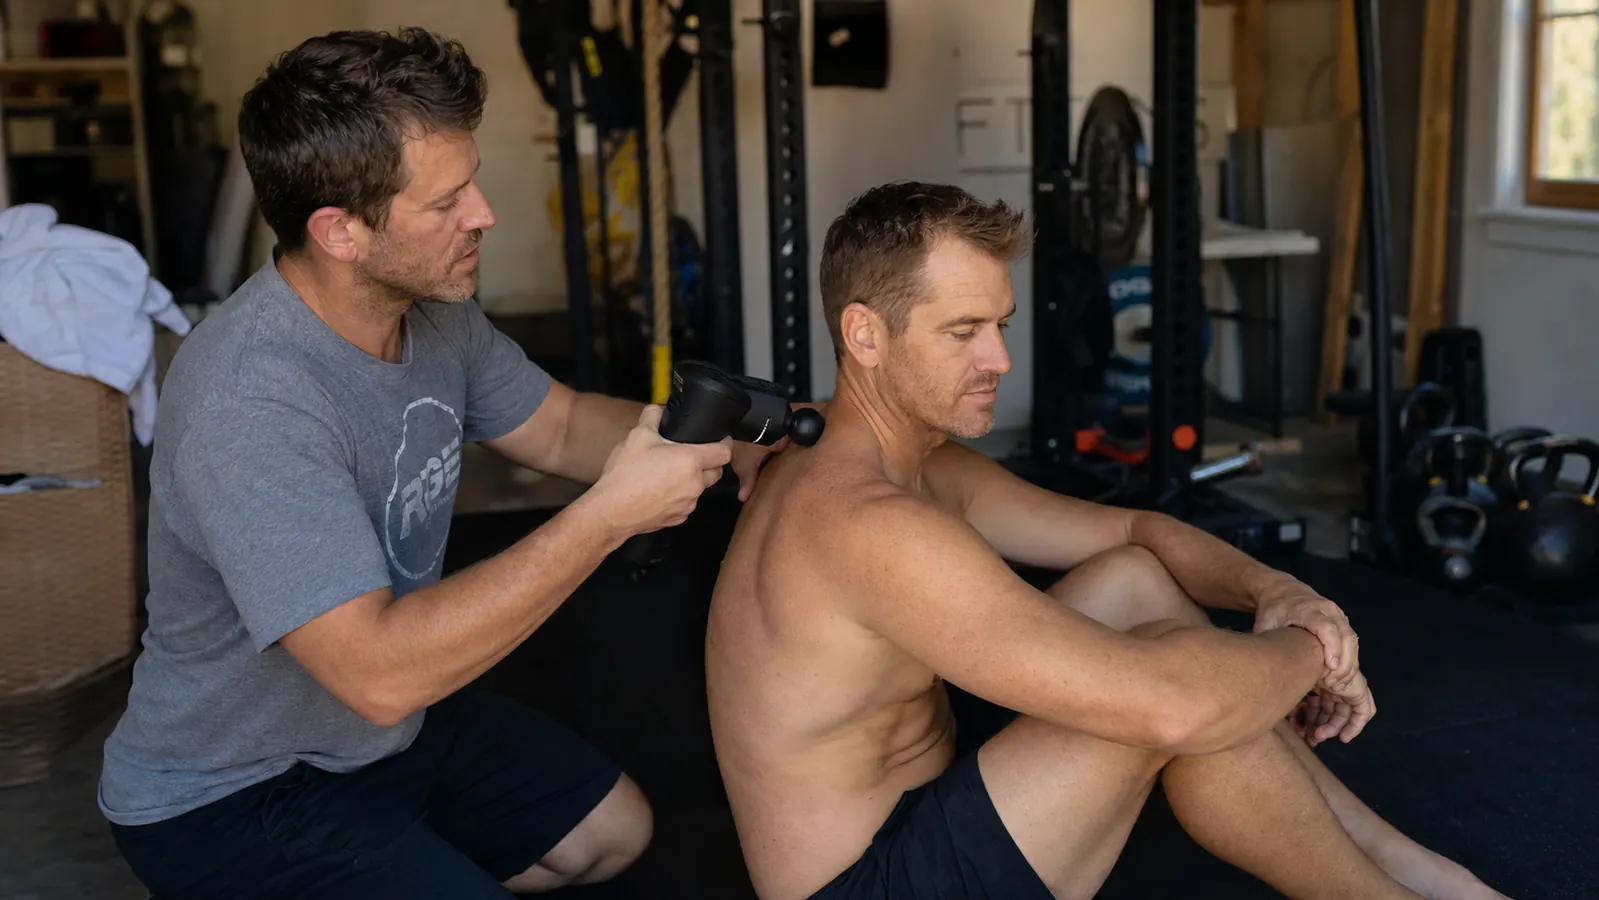
The bullet or pointy head is for precision trigger point work on a specific knot, like a stubborn spot in your upper trap or a nagging point on the IT band. Do not use the bullet directly on bone or anywhere near a joint. The flat head works well on the chest, lats, and the fleshy parts of the back. The fork attachment is designed to straddle the spine so you can work the paraspinal muscles without hitting vertebrae directly. When in doubt, use the ball head. It is the safest, most versatile attachment in the kit.
Never use any attachment directly on a joint, bony prominence, nerve bundle, or bruised area. That includes the spine itself, the knee cap, the elbow joint, the back of the knee, and the front of the shin where the bone sits just under the skin. These are hard no-zones regardless of which attachment you reach for.
Step 2: Set the Speed Correctly for the Situation
The TOLOCO has 20 speed settings, which sounds like overkill until you realize how much difference there is between level 3 and level 15 on an already-sore quad. The range runs from roughly 1200 to 3200 RPM. Here is how I break it down in practice.
Levels 1 through 5 are for warming up, working on sensitive or recently trained areas, and for anyone newer to percussion therapy. If you had a hard leg session yesterday and your quads rate a 7 out of 10 on soreness, start at level 3 and stay there. Levels 6 through 12 are the working range for healthy, warmed-up tissue where you want real myofascial release. This is where most of your post-workout recovery work happens. Levels 13 and above are for athletes who regularly use percussion therapy and are treating a chronically tight area that is not acutely inflamed. Most people rarely need to go above level 15, and level 20 is basically a novelty unless you have exceptionally dense muscle tissue.
Step 3: Work the Large Muscle Groups First, Then Smaller Areas
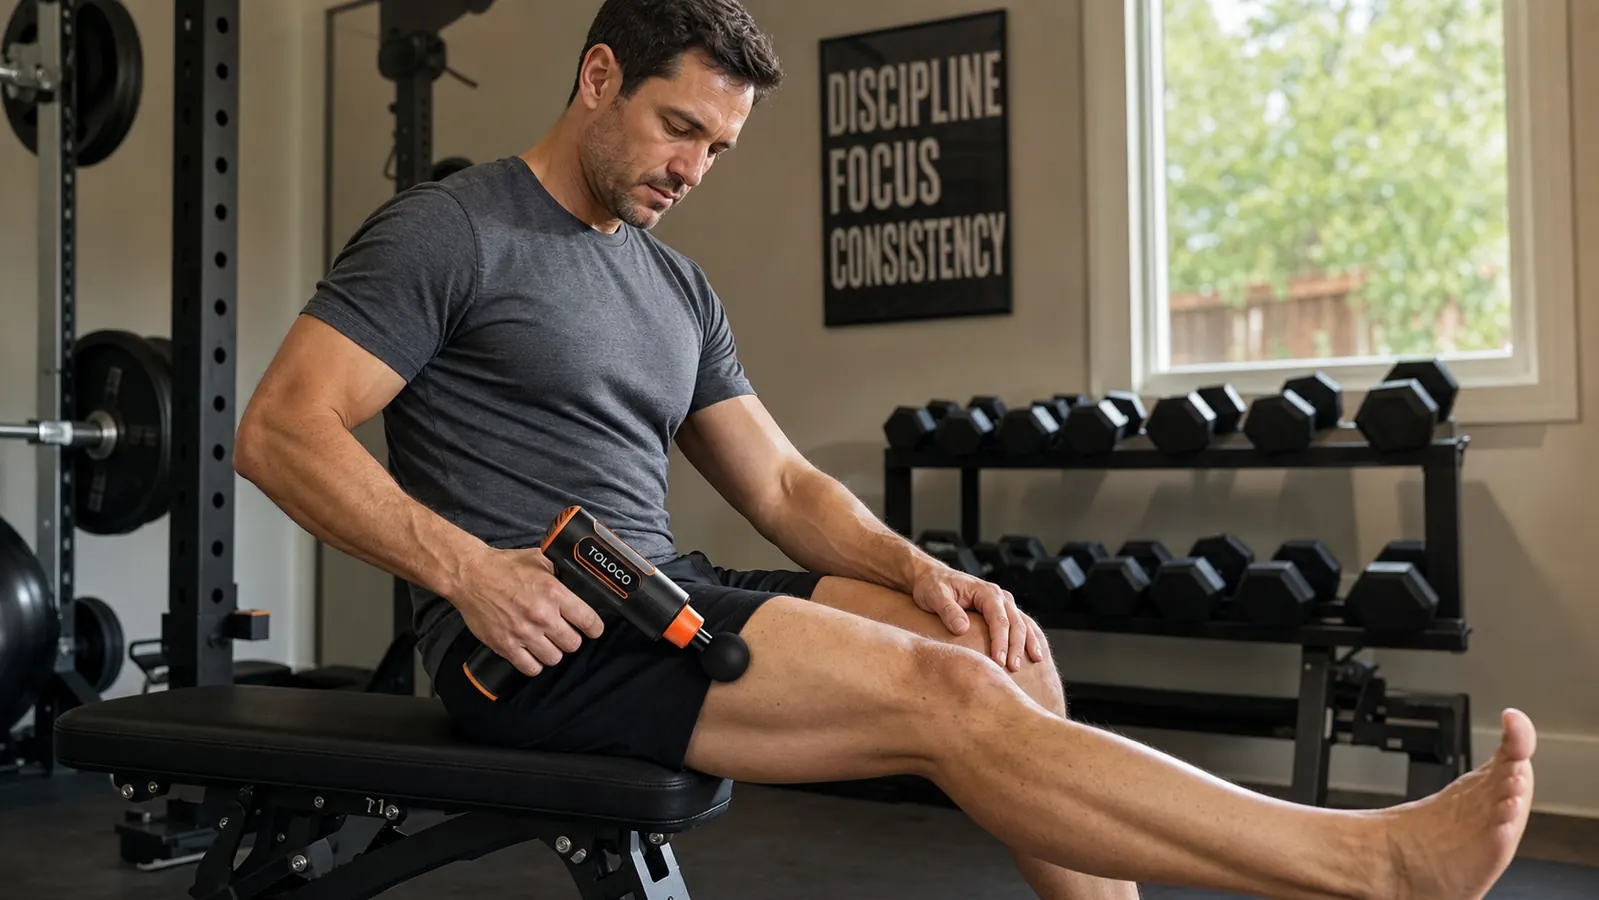
Start your post-workout session with the biggest muscles that took the most load. After a lower body day that means quads first, then hamstrings, then glutes, then calves. After an upper body day: upper traps, then lats, then pecs. The large muscles have more volume to absorb percussion force. Working them first also increases circulation to the whole limb before you move to smaller, more sensitive areas.
For each muscle group, keep the gun moving. This is the single most common mistake I see. People press the gun onto one spot and hold it there like they are applying pressure to a wound. Percussion therapy is designed for continuous slow motion across the belly of the muscle. Move the gun at roughly one inch per second along the muscle fiber direction, from the origin down toward the insertion. For the quad, that means starting just below the hip crease and working toward the knee without going past the joint. For the calf, start just below the back of the knee and work toward the Achilles tendon without running the gun directly over it.
Step 4: Control Your Pressure and Watch for the Warning Signs
The gun provides its own percussion without you needing to press hard. One of the biggest mistakes people make is leaning into the device with body weight. You should be applying only enough pressure to keep the attachment in contact with the skin. If you are pressing hard enough to see the skin go white or the motor is audibly bogging down, you are pressing too hard. Let the percussions do the work. Your job is to float the head across the tissue.
Watch for three warning signs that tell you to back off immediately. First, sharp pain. Dull, heavy soreness during treatment is normal and often indicates you are in the right spot. Sharp, shooting pain means you have hit a nerve, a joint, or tissue that is not ready for this level of input. Second, increased redness or swelling. If an area looks more inflamed after you use the gun than before, you overdid it on acute inflammation. Third, numbness or tingling. This means the gun is too close to a nerve pathway. Move away from that zone and drop the speed.
Step 5: Time Each Muscle Group and Know When to Stop
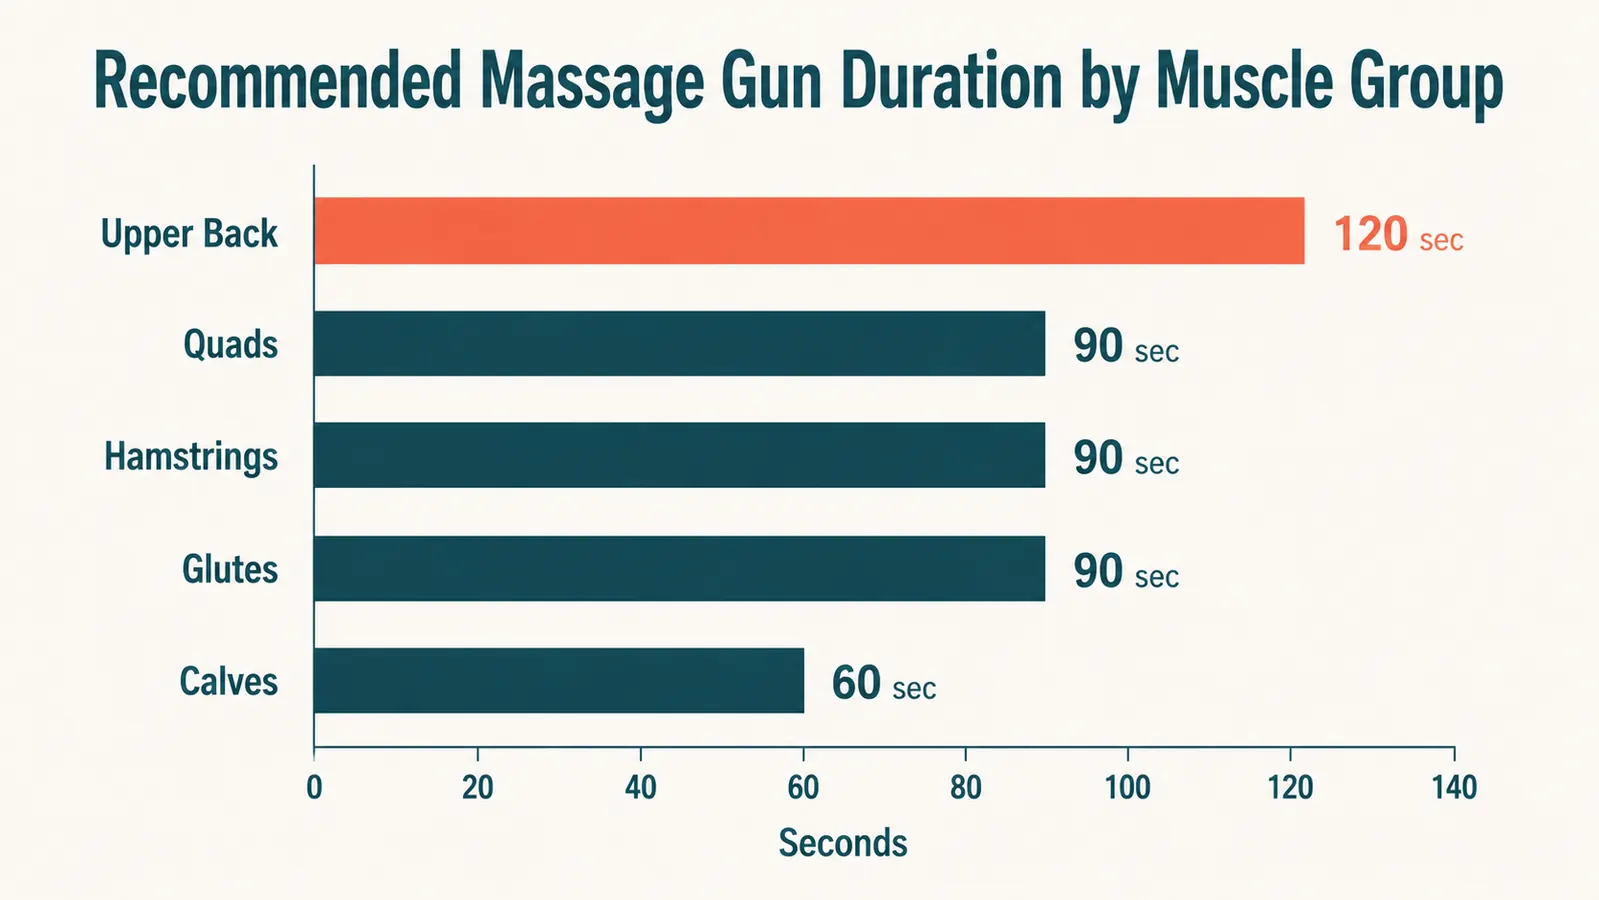
The guideline I follow and the one most sports medicine practitioners recommend is 60 to 120 seconds per muscle group, maximum. For large muscles like quads and hamstrings, 90 seconds is typically enough. For smaller muscles like calves and upper traps, 60 seconds is plenty. Do not confuse more time with more benefit. Once you have swept through a muscle two or three times at a slow pace, you have delivered the stimulus. Staying longer does not multiply the recovery effect; it just adds more mechanical stress to already-fatigued tissue.
A full-body post-workout session covering quads, hamstrings, glutes, calves, upper back, and traps should take 10 to 15 minutes total. If you are using it as a targeted tool for specific soreness, five to eight minutes is usually enough. The TOLOCO battery easily handles a full session. On a single charge it runs for roughly six hours at low speed, so you are never rationing time. Run through your muscle groups in order, put the gun down, and go eat something.
What Else Helps
Percussion therapy works better as part of a complete recovery protocol than as a standalone fix. The biggest complements I have found are hydration immediately post-workout (your fascia literally loosens more when you are hydrated), a 10-minute walk to flush metabolic waste before the gun session starts, and some form of sleep prioritization. I started tracking sleep quality about three months into consistent training with the TOLOCO, and the nights where I combined the post-session gun work with a decent cool-down walk showed meaningfully better recovery scores by the next morning than the nights I skipped either piece.
Foam rolling and a massage gun target different layers. A foam roller works the outer fascia and is excellent for broad areas like the IT band and upper back. A percussion gun goes deeper into the muscle belly and is better for specific DOMS and trigger point work. They are complementary, not redundant. If you want the full breakdown of what the TOLOCO does versus what a foam roller does, the comparison lives in the full TOLOCO Massage Gun long-term review. And if you want to see all the physiological reasons percussion therapy earns its place in a recovery stack, the 10 benefits of percussion massage after workouts covers each one with real context.
The gun does not do the recovery for you. It accelerates what your body is already doing. You still need sleep, water, and food. The TOLOCO just helps the tissue get back to baseline faster when you do the basics right alongside it.
Cold water exposure after a hard session, even just ending your shower cold for 60 seconds, pairs well with percussion therapy because the contrast between the two stimuli creates a pump effect in the circulatory and lymphatic systems. I am not a biohacker and I am not going to tell you to buy an ice bath. But finishing your post-workout routine with five minutes on the TOLOCO and then standing under cold water for a minute before bed is something I can tell you actually changes how I feel the next morning.
One last thing worth saying: the TOLOCO is a piece of equipment. Like any tool in your gym, it rewards consistent, correct use over sporadic heavy use. If you run through this protocol three or four times a week after your hardest training days, you will notice a difference inside two weeks. If you pull it out once a month on the days you are completely destroyed, it will help in the moment but will not change your baseline recovery trajectory. Build the habit around your hard training days and let it do its job.
Ready to actually run this protocol? The TOLOCO has every attachment and speed range you need for under sixty dollars.
Over 62,000 reviews, 4.4 stars, silent motor, 10 attachments. The tool serious recreational athletes reach for first because it covers the full range from warm-up activation to deep post-workout recovery.
Amazon Check Today's Price on Amazon →